Thursday, October 13, 2011

How to avoid pipe insulation wreath kink!

So, there are lots of gorgeous wreath making tutorials out there and the top tip for making a wreath form on a budget is to use pipe insulation for the base of the ring. This is great because pipe insulation is cheap, this is not so great because pipe insulation is made for straight pipes, not ring-shaped ones. Wreaths made this way have a tendency to have bends or creases or kinks in them, as demonstrated below...


(Wreath wrapped in burlap and decorated with t-shirt roses made from this tutorial by Cathie Filian.)

After several craft nights where we have made projects for the kids I decided it was time we made something for ourselves and burlap-wrapped wreaths seemed to fit the Fall-time bill. Off I went to Lowes and bought lots of pipe insulation and came home and tried to form some rings. Not very easy to do when you want a nice round circle without any kinks. My main philosophy when I'm coming up with things for Craft Night is that they need to be easy enough for anyone to turn out something great, and I was having visions of people struggling with their foam trying to eke out something resembling a ring shape. Not good, so I decided to experiment...

I thought about stuffing, I thought about wire, (but I didn't really have anything suitable in the house and I'd left this to the last minute), so then I just thought about maths. The inside diameter of a ring is always going to be less than the outside diameter, so trying to form something that is parallel into a ring is not going to work unless one side is shorter than the other. One Aha! moment later and this is my solution for a nice circular pipe insulation wreath form:

The foam has a slit pre-cut in it to allow it to be wrapped around the pipe but usually this is not fully cut. Cut right through this along the full length.

Then tuck one cut edge into the slit.

Bend the foam into a ring. Tucking one side into the other allows them to move over each other and allow a shorter inside diameter, if you look at the ends you can see the extra length.

Cut this excess from the ends so they are parallel (this photo is before cutting). Tape ends together with duct tape.

You can see that this doesn't give a nice circular cross-section but once it is wrapped and decorated you can hardly see the difference, certainly less than you'd notice a non-round wreath.

Labels: , , ,

Friday, September 9, 2011

No-Sew Swishy Superhero Cape (or Apron)


These capes require absolutely no sewing, just some scissors and an iron. I came up with the design after being asked to find something boy-friendly for our Mom's Craft Night. These are nice swishy, triangular-shaped, capes.

(The same method can be used to make no-sew aprons by following the instructions for a cape, and then cutting 2" wide strips parallel to the outer edges, to approximately waist level. These strips become the waist ties for the apron.)

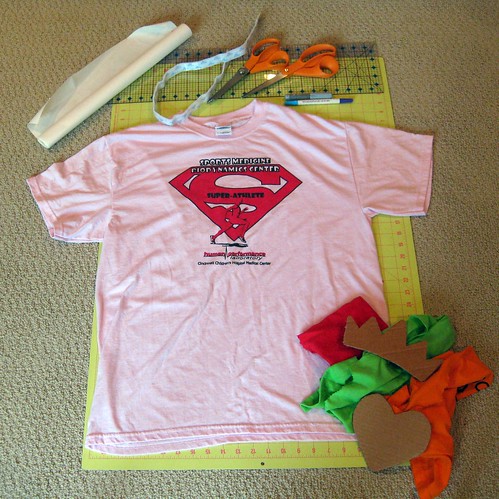
To make a cape you need:
One old t-shirt plus some scraps from other t-shirts for the applique.
Fusible webbing.
Iron-on Velcro.

It works best if the t-shirt has no side seams and is completely plain on either the front or the back (unless you want to incorporate the design on your t-shirt into your cape). The length of the t-shirt is the length the cape will be so you might not want a really huge one if you're making it for a tiny person (although you could always trim the bottom). The way it is cut out uses some of the front of the t-shirt (which is why it is best to not have side seams) to give it lots of width, so you can make quite a good swishy cape from a small or medium size adult t-shirt.

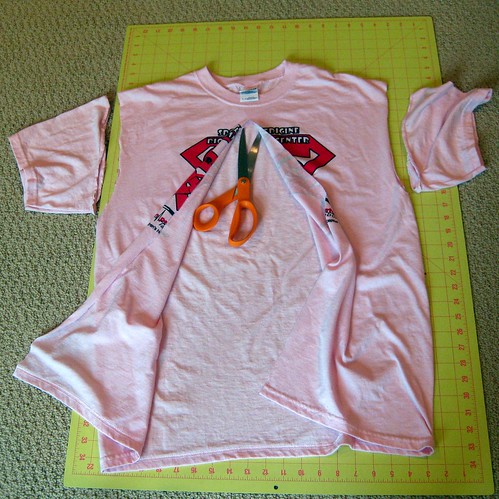
Start by cutting off both sleeves at the armholes (not absolutely necessary, it just makes it easier to lay it all flat later).

Make a cut up the centre of the front (for t-shirts with printing on the front or plain ones, if the printing is on the back then cut up the back!), STOPPING ABOUT 1" FROM THE NECKBAND. Make sure you don't accidentally cut the fabric underneath!

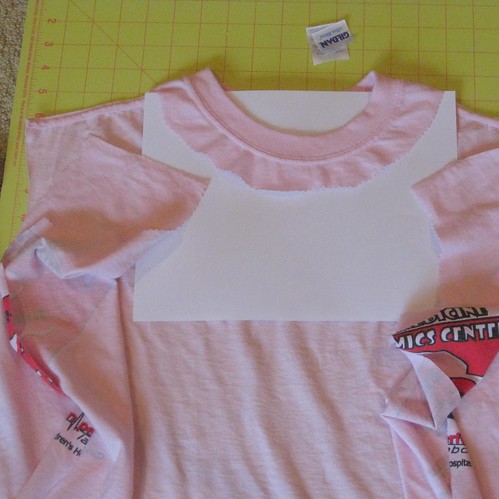
Using pinking shears (if you have them, otherwise regular scissors will work just fine) make a cut following the shape around the front of the neckband, about 1" away from it, stopping at the shoulder seams of the t-shirt. Then cut along the shoulder seams to the armholes on both sides. Cut off the label if there is one.

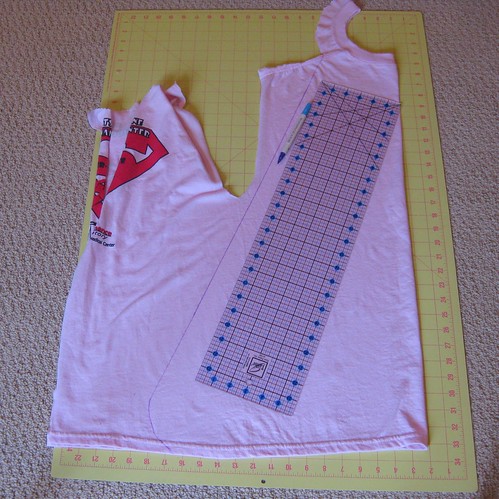
Open it all out and lay the shirt flat and then fold in half down the center. Draw a straight line from the corner of where you cut around the neckband down towards the hem of the t-shirt making sure to avoid the armholes. Use a disappearing pen or chalk if you have one to draw the line, otherwise cut inside the line so you don't see it on the cape. Add a little curve at the bottom to round off the bottom edge of the cape unless you are making an apron. For an apron cut it straight and then you can add a curve once you've cut your waist ties.

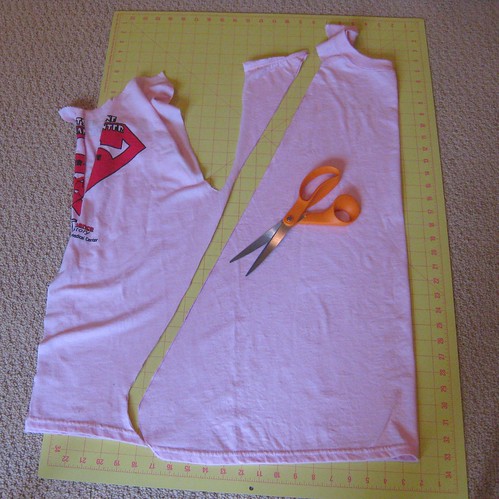
Cut along your line through both layers.

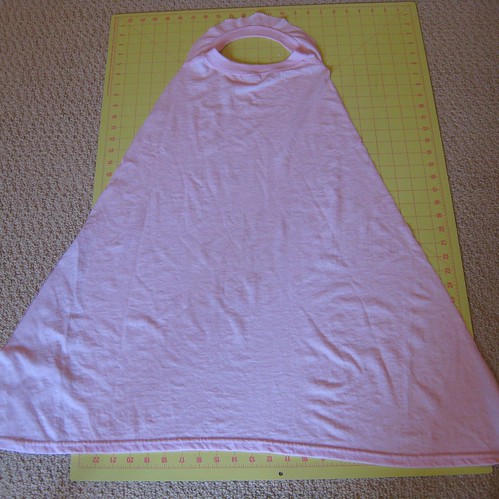
Open it out and you have a cape!

You could stop here but I think they look best with some embellishment, and I like to put Velcro at the neck for safety. If you want to make an apron now is when you would cut a strip 2" parallel to the edges, stopping at waist level.

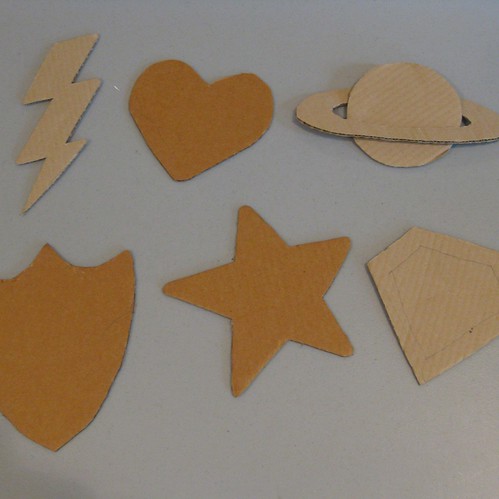
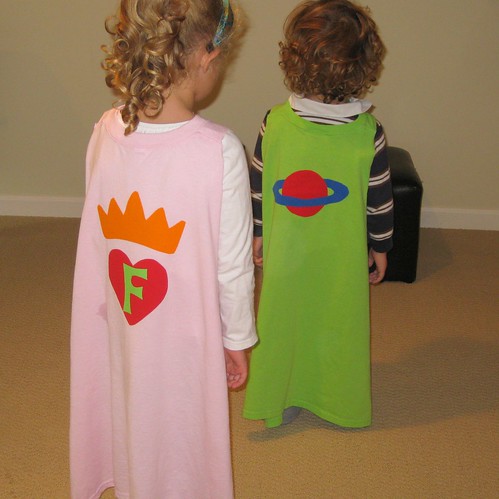
Decide what design you want on the back. For our Craft Night I made some templates that people could use as a base for their designs. It works best it there are no sharp corners so that the design doesn't peel off so easily (because we're not sewing it on!).

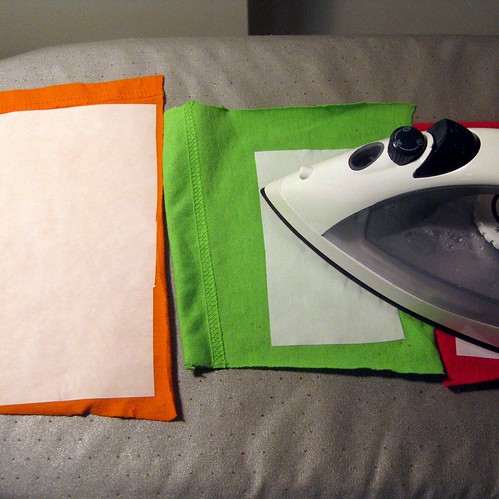
Cut some pieces of fusible webbing the right size for your design and iron them on the back of some t-shirt scraps (one advantage of having lots of people make these at once is that you get lots of scraps to choose from!).

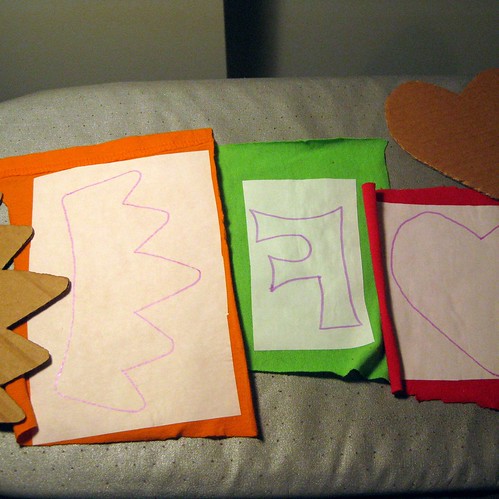
Draw out your design onto the fusible webbing backing paper. Remember it will be REVERSED when you iron it on so if your design is not symmetrical make sure you flip it before you trace it out. (And yes, I know I'm ignoring my own advice about sharp corners on the F!).

Peel the backing paper off the fusible webbing.

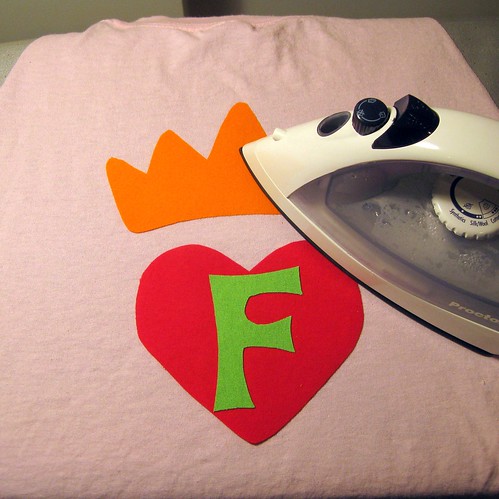
Arrange the design on your cape and iron it on according to the instructions for the webbing you are using.

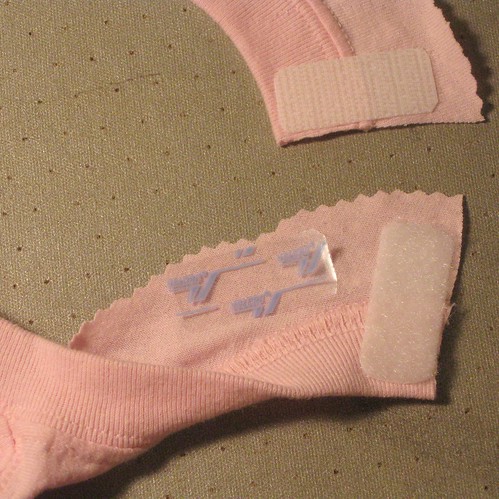
The last step is to apply some Velcro to the neck. Cut right through the neck band at the front and then cut a length of iron-on Velcro to fit. Iron it on following the instruction in the pack. For these it was 90 seconds each side with a hot steam iron. Let it cool and check it's not peeling at the edges, if it is iron again.


Try and convince your children to model them for you!

Labels: , , , , ,

Wednesday, March 23, 2011

Quick and Dirty Felt iPad Case

I took advantage of the storm sirens going off today to head down to the basement and cobble together a quick case for my shiny new iPad, before I take it out of the house for the first time. I bought the Smart Cover with it, and while that is great around the house I don't fancy sticking the whole thing in my bag with just that for protection. I made it so that it also doubles as a handy mat to stand the iPad on in the house.
It's made from a felted wool sweater and the button is a beautiful old mother-of-pearl one from my Granny's button bag, which makes me happy. I made it so that the flap tucks inside, which means that the button is not on the main body and that means a flat surface to lie the iPad on.
I have great plans to come up with a fantastic case in time, but for now this works just fine. It's a bit baggy and a bit quick and dirty, but it should keep my new toy a little bit safer in my bag.

Labels: , , ,

Tuesday, March 22, 2011

"Cute Little Turtle"


Freja's a bit sad at the moment because her Dad is away on a work trip. Today on the way back from the Nature Centre she asked me if I could make her a "cute little turtle" because she loves the things I make her the best.

So I had a go while she's at pre-school, I hope she likes it!

Labels: , ,

Sunday, February 13, 2011

Valentine Heart Crayons


Valentine's Day is a big day for kids over here and it's usual to send cards in for the whole pre-school class. This year I decided it would be fun to try and make something so Freja and I decided to give heart-shaped crayons a go. I bought some heart-shaped ice cube molds from the dollar section in Target and a big box of crayons. We're not big crayon people in this house so we didn't have any spare to use, but this could be a good way to use up old crayons if you happen to have some.

The first thing we did was remove all the paper and break the crayons up into small pieces. We just went for as small as we could do with our hands. We tried to fill the molds up so they were pretty full but without having any bits hanging over the edges of the shape. We went for some red, pink and purple, and some blue and green.


Next I put the molds on an old baking tray, poured a layer of water on it and stuck them in a low oven set at 200F/ 93C. I watched them closely until they had completely melted, about 10 minutes. (This pic shows them about half-way through, I waited until there were no visible lumps).

I took them out of the oven to cool and gave each one a little swirl with a bamboo skewer.


Once they were cooled we put them into these little plastic heart boxes which are also from the dollar section in Target.


Labels: , , , , ,

Thursday, January 13, 2011

Hoops!


I've had hoops on the list of things to get for the kids for a while because the ones we did have got left out on the deck in the summer and pretty much melted, and it's hilarious rolling a hoop along the ground and watching Magnus chase it.

I've also been reading a few things about hooping as not just for kids recently, (thanks Helena) so I thought that while I was at it I'd take a look into adult-sized ones. Turns out adult ones are huuuuge compared to the ones you can get in a toy shop, it makes it much easier to learn because each revolution takes longer. The ones you can buy start at about $30 plus shipping but I also found this very helpful tutorial on hooping.org that shows you how to make your own from plastic pipe which costs about $30 for 100ft, enough for several hoops.

My parents were here for Christmas so Dad and I took a trip to Tractor Supply Co. for supplies. Dad was in heaven with all the tools and hardware but we managed to get out without too much that wasn't on our list (although I did find a metal potholder loom in the discounted Xmas section, more on that another time...). We got the pipe cutter suggested on the tutorial, it cut through the pipe like butter, and sticking the ends of the tube in a boiling kettle softened them up enough to get the connectors in easily (according to Dad who did it for me!)

The next step was to decorate them, I've just gone for electrical tape on these but if I make more I might look out for some fancier tape. I did Magnus' first with alternating orange and yellow and should really have done a solid base layer first because the pipe underneath is black so it shows through a bit. For Freja's I did a solid base of pink with green and yellow stripes, and mine is red (mostly, I ran out a bit early!) with pink and blue stripes.

Now we just need to learn to use them. Right now I can just about keep my hoop up around my waist, having always been hoop-challenged in the past, the large hoop really does make a difference. I have a DVD which I'm hoping to watch when Magnus' head is not in hooping distance because they are pretty heavy! I think Freja will gets it soon and Magnus is happy to just roll his and jump into it on the ground for now.

Labels: , ,