Saturday, October 23, 2010

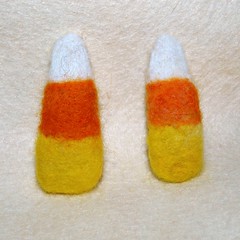
Needle-felted candy corn hairclips


I still haven't managed to get back into the swing of making things much but last night after the kids were in bed I decided it was time to have a go at something I've been thinking about for a while. Candy corn isn't something I really knew about before we moved to the US, but over here it appears everywhere as soon as the summer is over. It brings backs good memories for me of our first Halloween over here even though it's horribly intensely sweet and can give me a shocker of a sugar rush. I've spoken to a few people who say they can't eat it anymore after overdosing on it as a kid and I do try and keep the kids away from it if I can, but inevitably at this time of year a few pieces sneak in here and there.


I've been thinking about making candy corn hairclips for Freja for a while because the shape fits really well with those snappy clips. I was going to just cut the shapes from coloured felt but last night I decided to try needle-felting instead.


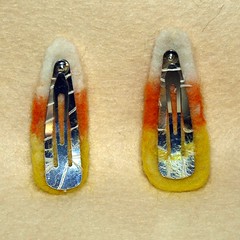
I formed the basic shape from white roving and then added the orange and yellow stripes, then stitched them to the clips. The first one I made is larger and more shaped but does look rather huge. I tried to make the second one smaller but in doing so lost some of the shape. I think they'd probably look cuter on smaller clips but I didn't have any, maybe I'll try and pick some up when we go shopping next. Overall I'm pretty happy with how they turned out and if Freja doesn't like them I might steal them for myself.

Labels: , , , ,

Friday, September 3, 2010

SuperMagnus!

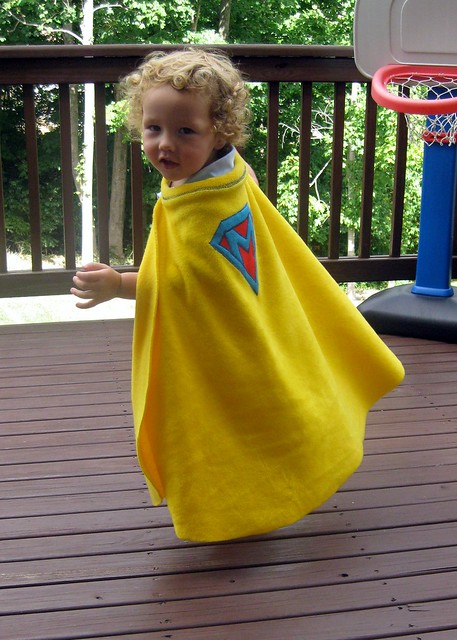
Magnus has been showing rather a lot of interest in the dressing-up box recently. So far this week we've had Alice, Dorothy, Upsy Daisy and Snow White. Cute as he looks in a dress, I thought it was about time the poor child had some dressing-up clothes of his own. So here is SuperMagnus!

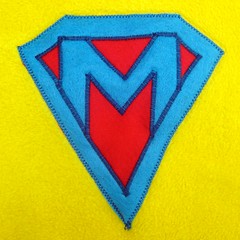
The pattern was based on this free download pattern from Sewing Mamas, a very friendly forum for anyone who sews for kids. I used fleece that I already had for the cape and the applique is felt

It was very quick to make especially as I left the edge of the cape unfinished. Some of the sewing is a bit wobbly because I was working with a little helper, but he had lots of fun pushing the foot pedal to make the sewing machine stop and go. The neck is held together with Velcro which should come undone if it gets caught on anything. I have a feeling this won't be the last one I make...

SuperMagnus to the rescue!


.

Cakes


This post has been sitting half-finished in my draft folder since before the summer, oops (and sorry Fanny!) so I'm just going to post it now anyway because I've started sewing again after a little lull, and hopefully there'll be other stuff to post about soon:

These are all the cakes I made for the Alice in Wonderland obsessed one for her 4th birthday recently (I do think that's an improvement on last year's princess obsession). The Eat Me cupcakes were for pre-school on her actual birthday and the big Alice cake and the other cupcakes were for her party.

Living in the US has made me too much of a label-reader to be able to bring myself to buy the ready-made fondant icing here so I thought I'd have a go at making my own. I had a bit of trouble choosing a recipe though, all of my UK recipes books seem to call for egg whites, which I wasn't too happy about using for cakes that I was sending in to Freja's school. The US recipes which I found online all seemed to call for shortening which is also something I couldn't bring myself to buy after reading the back of the packet. I eventually found this one (Recipe 1) which uses just water, sugar, glycerin, glucose and gelatin. I looked in the grocery stores for the glucose and the glycerin but couldn't find any, so I had to go to the craft shop Michaels.

The recipe was pretty easy although plain gelatin does smell a bit gross, it brought back memories of rendering down the suet for my mincemeat!I found I had to add a little bit more water as I was kneading in all the sugar but it eventually all came together and I had a nice big smooth ball of fondant. I doubled the recipe because I wanted to keep some for the big cake, and ended up with a ball about the size of a large grapefruit.

For the Eat Me cupcakes I used some gel food colours to make pink, blue, and yellow and added a bit of vanilla extract as I was kneading the colour in to make the icing taste a bit nicer and soften it up a little bit. I rolled it out on a board covered in icing sugar and used some cutters from Ikea to cut out little scalloped circles and some pink hearts which I left overnight to harden.

The buttercream is Martha Stewart's Fluffy Vanilla Frosting recipe which is just sugar and butter and vanilla with lots of beating air into it.

For the cupcakes I tried a new recipe, Martha Stewart's One Bowl Chocolate Cupcakes which has since become my go to recipe for cupcakes because they come out nice and flat and easy to decorate. The batter is really runny so I've found the easiest way to get them into the cases is to pour it from a jug, and for the best results use a tin that is as deep as the paper cases.

Labels: , , , ,

Thursday, April 29, 2010

4th Birthday outfit


This is Freja as she headed off to pre-school this morning in her 4th birthday outfit.

The skirt is another Insa from the Farbenmix book Sewing Clothes Kids Love, although I cut this one out in a hurry and forgot I to add a seam allowance to the pieces, so it's a little smaller all over than the last one. I love this pattern, it's so quick and easy to sew-up (especially if you're lazy like me and don't topstitch the seams) and it hangs really nicely. The fabrics (only two this time) are from Hobby Lobby and the top skirt is trimmed with ric-rac. The bottom skirt is trimmed with what I now know is called eyelet lace in the US, but I would have called it broderie anglaise. I bought the t-shirt and did a very quick applique on it in one of the skirt fabrics. I was going to make a hairband to match but with making her birthday cupcakes I ran out of time. As it turns out there was this beautiful corsage hairband in the parcel her Granny had sent from Sweden so she decided to wear that today too.

Happy Birthday gorgeous girl! xxxx

Labels: , , , , ,

Tuesday, March 30, 2010

Dotty Birkenstocks


I've had this pair of Birkenstocks for a few years now and decided they needed a makeover. They were originally red and much as I love red shoes I've hardly worn them, I think because I didn't really like the way the black buckles and soles looked with red uppers. I saw this blog post recently about covering shoes with fabric and Mod Podge, and was inspired to give mine a similar treatment.

I didn't use Mod Podge because I'd heard it could be very hard and crack, I decided to try my old faithful Aleene's Tacky Glue instead (I think it's the same as PVA in the UK). I smothered the shoes in the glue and cut out some fabric pieces bigger than the tops of the shoes in case the glue shrunk the fabric slightly. I stuck the fabric down cutting a slit where the fabric went over the buckle and then smothered the top of the fabric with another layer of glue. Once the glue was dry I trimmed around the edges with sharp pointy scissors for the top, and a craft knife by the soles.

I'm pretty pleased with how they've turned out, they still seem to be fairly flexible and don't feel too rough. I don't know how durable they'll be but I think if anything is going to happen to them it will just be that the fabric peels off. In that case I will either glue it back down or rip it all off and start again with different fabric for another new look. It looks like we're in for nice weather this weekend so I shall try them out then.

Okay, since I wrote this post this morning I have been wearing them in the house and I think we might have a solubility problem with the glue. I've noticed it goes white again if I accidentally splash water on them. Oops! I will be checking out the glue section the next time I go shopping for something a little more waterproof, or maybe a flexible varnish....

Labels: , , ,

Thursday, March 25, 2010

Playing with ruffles

I think I might be getting addicted to feet, for my sewing machine that is. My latest toy is a ruffler, a handy little thing that, as the name suggests, makes ruffles. No more gathering by hand, just lovely even ruffles done by machine. That's the theory anyway, it's a bit of monster as feet go and it has adjustable bits so it helps to know what these bits do. There's a great free guide to using a ruffler on youcanmakethis.com which is well worth a read, preferably before you start. I have to confess to not having done the calibrating my foot to my machine thing yet, although the engineer in me will probably want to do that at some point, for now I just wanted to get ruffling!
So here is a skirt made by cutting strips of fabric and ruffling one strip onto the next. When you're not using a pattern it doesn't really matter what your 'ruffle factor' is. It makes for a great twirl:


I think this is going to be fun, what shall I ruffle next?

Labels: , ,

Sunday, March 14, 2010

A rainbow unicorn peasant dress


Yet another fabric that Freja chose herself! I thought I'd better sew it up soon before she thinks she's too old for unicorns. The fabric is very thin cotton and a bit see-through so I backed it with the green cotton which I had found in Goodwill. I winged the pattern using a combination of a dress she already has and used this peasant blouse tutorial to help with cutting out the sleeves. It's a little short because originally I was going to make it a pillowcase sundress until she told me she wanted sleeves, but she usually wears shorts or leggings under dresses so I don't think that matters. She seems happy with it, now we just need it to stop raining so she can wear it.

Labels: ,

Monday, March 8, 2010

An Alice dress


Freja and Iwent to the cinema on Saturday, it was the first time I had been since I was pregnant with her, so about 4 years. We went to see the new Tim Burton Alice in Wonderland which is probably not the most appropriate movie for a not quite 4-year-old, but she had seen the trailer and really wanted to go. We went on the condition that she told me if she wanted to leave because it was too scary, but she sat through it all and I think a lot of the scarier stuff just went over her head. I think she enjoyed it, she's been talking about it ever since. I keep catching her pretending to eat cake and then grow bigger, and diving over the back of the sofa pretending to fall down the rabbit hole.
I only decided on Thursday to make her an Alice dress so this was a very quick and slightly bodged job, but she seems happy with it. I used the bodice pattern from a pattern I've got just to get the size and the sleeves, and then winged it from there. It's supposed to look something like the dress here. I just used quilting cotton and the fabric isn't quite so bright in real life.

Here she is pretending to jump down the rabbit hole.

Monday, March 1, 2010

A colourful twirly skirt for Freja


Freja chose these fabrics when we were in the fabric shop last week, they are very bright and summery with ice cream and cupcakes and strawberries. The pattern is the Insa skirt from the Farbenmix book that I made the leggings from at the weekend. I managed to get it all done in an evening, including tracing out the pattern. Using a rotary cutter and mat to cut things out is so much speedier than scissors.

She seems to like it and insisted on wearing it today even thought there is still snow on the ground, can you tell she chose the tights herself?

And here's a blurry picture to demonstrate it has twirlability:

Sunday, February 28, 2010

Maybe knit fabrics aren't so scary after all


Not the most exciting of garments, and pretty horrible poly/cotton remnant fabric, but I am very excited about this humble pair of leggings that I made last night for Freja (excuse the terrible photo, she wasn't feeling very cooperative). They are the first thing I've ever made from knit fabric. I have been petrified of sewing with the stuff. For some reason I was convinced that I needed a serger, a special machine that sews and finishes the edge at the same same time like you see on store-bought clothes. Well, these leggings were made on my regular sewing machine and I think they've turned out okay.

There seem to be a few ways you can sew knit fabrics with a regular machine, it is important to make sure that the stitching can stretch with the fabric so that it doesn't break when the fabric is stretched as it is worn. A zig-zag, triple zig-zag or a stretch stitch which goes forward and back, could all be used, but for the seams on these I used a regular straight stitch and just stretched the fabric as I was sewing. I used a triple zig-zag for the hems and finishing the elastic.

The pattern was so easy, it is the Riviera leggings from the wonderful Farbenmix/ Studio Tantrum collaboration, Sewing Clothes Kids Love. There is only one pattern piece and it is really quick to sew. I made them in a cheap fabric first, without modifying the pattern at all, so that I could check the fit on Freja. I have a couple of minor tweaks to make and hopefully the next pair will fit her perfectly, although she's pretty happy with these ones. The book is full of great advice for a beginner like me and I'm looking forward to getting some of the other patterns in it traced out and sewn up.

I'm so excited about all the possibilities my first foray into the world of knits opens up. Most of the clothes my kids wear are made from stretchy fabrics and now I can think about making t-shirts, shorts, dresses, pyjamas, more leggings...

But just in case Peder reads this, I reserve my right to decide I need a serger in the future!

Labels: , , ,

Monday, February 22, 2010

Playing with quilting


I have been thinking about having a go at quilting for a while, living in the US now I kind of have to. I did a bit of patchwork when I was little but always by hand, not on the machine. When I saw a log cabin quilt-along come up on a sewing forum I decided that this was the perfect opportunity to get started. Log cabin quilts seem to be universally described as perfect for beginners, each block is made up of strips around a central square. The strips represent the logs in a log cabin and traditionally they have a red centre to represent the hearth. They are usually made with a contrast between light and dark, this means you can make bigger patterns when the blocks are sewn up into a quilt.

I'm not sure I'm ready to tackle a whole quilt just yet so my plan is to try and make some cushion covers for our living room. The quilt-along isn't due to start until 1st March so for now I'm just planning what to do and making sure I have the supplies I need. I have bought a jelly roll (pre-cut 2.5" strips) of the gorgeous Momo Wonderland fabrics, which should hopefully brighten up the very beige room.

This black and white cushion was made from a cheap bundle of fat 1/8ths from Jo-Ann's, just to test out how it all works. I quilted the top by 'stitching in the ditch' (along the seam lines) because I don't think I'm quite ready for free-form quilting just yet. The edges are finished by folding over the backing fabric and stitching it down. I didn't put a zip in this one because I was being lazy, but I will probably try and do that for the next ones I make.

Labels: , ,

Sunday, February 21, 2010

A little cashmere panda

This little guy is a present for my cousin's new baby boy. We both loved pandas as we were growing up, we had matching toy ones who were regularly married to each other. (Actually, we both still have them, mine is called Peter which provided much amusement on my Hen night seeing as my husband is Peder).

I made the little panda from thrifted cashmere sweaters which have been washed in the machine to fuzz them up a little bit. I used the bear pattern from the Aranzi Aronzo book Baby Stuff, which I picked up in the library on a whim, and adapted it to add the panda eyes. I tried using the sewing machine but that didn't work too well because the cashmere was so stretchy, so I sewed him by hand. He's turned out a completely different shape to the bear in the book but nevermind, he may be lumpy but he's very soft.


The End!


Labels: , ,

Tuesday, February 16, 2010

Some small snowy day projects...


A wool felt ball necklace for me to brighten up a snowy day.


A lavender heat pillow in baby corduroy for us to keep.


Labels: ,

Sunday, February 14, 2010

A lavender heat pillow


This was so easy and it feels so good I'm kicking myself for not making one before.

I didn't use any tutorial in particular. It's just a piece of flannel about 16" x 14" folded in half to make 16"x 7". I stitched along one short side and the long side, turned it right-side out and stitched two rows along the length to divide it into three channels. I used a makeshift funnel to fill each channel approximately two thirds full with a mixture rice and a bit of lavender, and stitched the end shut. I like this shape because it can be used as a flat pillow or the channels allow it to sit easily around your neck. I've already made a second one a little bit longer (this time in a fine corduroy) and I think that works even better around the neck.

About a minute in the microwave makes it lovely and toasty for applying to aching muscles. I used rice because that's what I already had in the house, but I've seen them made with flax seed and feed corn too (not pop corn, that could be interesting!).

The two I've made so far are making their way to Sweden with our visitors, so I will have to go and make another one for us to keep.

P.S. If you do make one make sure there are no metal threads in the fabric!

Labels: , , ,

Monday, February 8, 2010

My first attempt at free motion machine embroidery


Okay, so it's a bit rubbish, but it was my first time...

I will be practising more, it was very fun to do once I managed to work out how to drop my feed dogs, install my new Big Foot presser foot, and get the tension on the threads about right.

I've signed up for a fabric squares swap so if I can get the hang of this, and also manage to work out how to do patchwork, maybe I'll get to try a bit of free motion quilting sometime soon too. I have a feeling that I might be wandering into the section with all the really pretty thread next time I'm in a craft store...

Labels: , ,

Thursday, February 4, 2010

A turtle appliqué t-shirt for Magnus

This was a quick project to practise my machine appliqué, and use up a blank t-shirt I'd bought for Magnus before he outgrows it. I completely cheated on the design and cut the turtle out from some Ikea furnishing fabric. I hope he likes it!

Labels: , ,

Tuesday, February 2, 2010

Felt Danish Heart Purse Tutorial

I've always loved the look of woven paper Danish Christmas hearts and when I saw these felt ones on the Felt Cafe blog the other day I was inspired to have a go at making one in felt myself. I decided to turn it into a small purse and here's how I did it...

You will need:

Two colours of felt, I used some felted sweaters. Approximately 4" x 12" each.
Some fabric for the lining. Approximately 4" x 12".
Needle and thread.
Button.
I used a sewing machine for the lining but it could be done by hand.

An internet search for Danish Christmas heart will bring up lots of directions on how to assemble these hearts so I'm not going to go into huge detail here. This is the link from the Felt Cafe blog. There are some very fancy designs out there but I decided to start with the simplest possible one.

You could cut out a template to use as a pattern, or wing it like I did. The shape you need is a square (mine was 3.5" wide) with a semi-circle added to the top edge.

Fold your felt in half and lay the pattern on the the felt so that the bottom edge of the square is on the fold. Cut one piece (on the fold) from each colour. Make two equally spaced cuts from the folded edge, through both layers of felt, just slightly longer than the square.

Weave the two pieces together thinking about weaving through the loops rather than up and over them.

To make the lining cut out a piece of fabric the same size as one of your pieces of felt. Iron one of the long edges over by about 0.75" and then fold in half longways with the right side in. Stitch along the remaining sides about 0.5" from the edge. It's probably best to try and make sure the fit is right before you sew it as I think different thickness felt would need a slightly different sized lining. Trim with pinking shears close to the stitching.

Decide which side you would like to leave open and fit the lining into the heart so that the open edge is across the rounded part of the heart on that side. Stitch the lining to the felt around the whole opening by hand. Now stitch the other rounded side of the heart closed along the edge, and continue stitching all the way around the heart shape to give it some stability. You could use blanket stitch and contrasting thread but I decided to try and match my thread so you couldn't really see the stitching.

Cut a button hole in the top flap of the open side and stitch a button to the inside of the back flap.

Give to your three-year old daughter so she can fill it with small rubber princess clothes.

If you do make one I'd love to see pictures.

Labels: , , , ,

Sunday, January 31, 2010

Kanzashi Fabric Flower Necklace


While I was in the middle of making my flower corsage necklace the copy of Kanzashi in Bloom that I had ordered arrived. I love the way these Kanzashi flowers are made up from individual petals, a bit like the Betz White felt poinsettias I made before Christmas. The book is really easy to follow and shows how to make three different petal styles from folded fabric squares, and combine them into all kinds of beautiful flowers.

After trying out all the petal styles I was itching to make something proper so decided to have a go at a necklace using Kanzashi flowers and the same fabric beads I made before. The fabric is plain old dotty quilting cotton from Jo-Ann's and the buttons are some gorgeous old mother of pearl ones from Mum's button box.

The fabric beads were made from a 2.5" strips, folded to 1" wide and cut into 2.5" pieces. It's not easy to tell from this photo but the flower on the left is bigger than the other two. The large Kanzashi is made from 3" squares and the two small ones from 2.5". I added small round pearly beads (left over from our wedding favours) between the fabric beads. This allows the necklace to curve better so I could have it shorter and fastened with a clasp.

Labels: , , ,

Wednesday, January 20, 2010

Frayed Fabric Corsage Necklace Tutorial

Usually when the new Boden catalogue finds its way into our mailbox I flick through it, think I love that, I could make that, and then I forget all about it. This time I actually decided to do something about it. I love this Corsage Flower Necklace and thought it would be a great way to liven up a boring jeans and t-shirt outfit once the weather warms up a bit.

So, here is the necklace that I made, inspired by Mr Boden's creation:


And here is a tutorial if you would like to make one for yourself. It is all done by hand, no sewing machine required!

Although it pains me slightly, I'm going to do this in inches, seeing as I live in the US now, and that's how things come, and that's how my ruler is marked.

The necklace is made up of a mix of fabric beads and fabric flowers threaded on a strong thread attached to two rings. It has two ribbons which are attached to the rings and tied in a bow behind the neck.

You will need:

Fabric
. Mine is some lightweight linen from Jo-Ann's, but quilting weight cotton should work about the same. I doesn't matter if it has a wrong side but the edges are left unfinished so don't use something that will fray really badly. I used plain and striped and bought 12" of each. It was 54" wide and I could probably have made two necklaces with that quantity.
2 rings approx 3/4" diameter. Mine are actually beads.
Grosgrain ribbon. Mine is 5/8".
Buttons/beads for decorating the flowers. I have a mix of beads and fabric-covered buttons.
Strong thread and big needle for threading the necklace together.
Fabric glue like Aleenes Tacky (PVA in the UK I think?).
Fusible webbing (not pictured).
Needle and thread for hand-sewing.
Pins.
A thimble comes in handy for threading the necklace.
A cork board is useful for pinning the beads while they dry.
An iron.

To make the beads:


Cut a 3" wide strip of fabric. With the right side down, fold each long side in towards the middle of the strip so that they overlap evenly and you end up with strip about 1 1/4" wide. Press with the iron. Cut this strip into pieces 2 1/2 inches long. I used two strips of 54" fabric.


Take one of your folded pieces and fold it in half with the overlapped edges inside and so that the two raw edges are together. Roll the strip up tightly from the raw edges and apply a thin line of glue about 1/4" from the end. Roll up completely, and pin in place until the glue dries (on a cork board if you have one). I made 38 beads in a mix of the plain and striped.

To make the flowers:

Cut strips of fabric to the measurements for the size of flower you are making:
Large flower 1 1/4" x 54" (or the width of your fabric). I made 1 plain.
Medium flowers 1" x 54" (or the width of your fabric). I made 2 striped.
Small flowers 3/4" x 27" (I made 2 plain and used half the fabric width for each, but should have made the strips a bit longer because the flowers turned out a bit flatter than I would have liked).

Take a needle and thread and make a few stitches so that your thread is securely attached to the end of the strip. Make a long running stitch (about 1/4" stitches) about 1/8" from the edge along the whole length. When you get to the end gently pull the thread so that the fabric ruffles up to about 9" long (for all sizes of flower), and fasten off the thread securely.

You could leave the fabric like this if you want a more frilly look, but for a more pleated look pinch the gathers up into pleats with your fingers and press them with an iron. Don't worry too much about getting them perfectly even, but try and vary the direction of the pleats and make sure they are approximately evenly spaced.

To form the flower shape lay the ruffle on a flat surface and spiral it around to form a flower shape with about 3 layers, each layer slightly larger than the one above. Keep the centre of the top layer nice and tight and try and have an even gap between the edges of the different layers. You could stitch this together but I chose to use glue because it gave a bit more control over the shape. To do this gently lift up the layers and glue the back of one layer to the top of the layer below, make sure nothing has moved out of place and then leave on a flat surface to dry.

The ruffle half way through ironing in pleats:
The rolled-up (but not glued) flower from above and below, note the larger hole in the base from the spiraling.

I did try making the ruffles using a long straight stitch on my sewing machine but it was much harder to pull the gathers up, and my fabric frayed too much, so I went back to doing it by hand.

Once the glue is dry, decorate with your choice of buttons and/or beads. I stitched mine on but you could use glue if you prefer.

To assemble the necklace:


Iron the fusible webbing to the wrong side of some of the fabric and cut out a circle, approximately 1/2" smaller than the diameter, for each of the flowers. Lay out your fabric beads and flowers and decide on your arrangement. Remove the flowers and put the fabric circles in their place with the fusible webbing side up. Thread your big needle with strong thread and start threading the beads and fabric circles onto the thread. Try to get all of the beads aligned in the same direction, you could change direction at the half way point, but I didn't think of that until too late for mine! When you get to the circles make several large stitches across the diameter, curving slightly to try and follow the shape you want the necklace to hang. Glue the flowers to the fusible webbing side of circles with fabric glue, and allow to dry. Trim away any long frayed threads from the fabric.

Attach the ends of your thread securely to the rings. Cut two pieces of ribbon approximately 25" long, tapering the ends to prevent fraying. Knot one end of each piece of ribbon to one ring. Tie the other ends in a bow behind your neck, and admire!

The final dimensions of my necklace are:

Large flowers 3.5" diameter.
Medium Flowers 3" diameter.
Small Flowers 2.5" diameter.
Length from ring to ring 24".

I have since made another necklace using these beads and Kanzashi flowers which gives a completely different look - here it is.


This is my first tutorial so please let me know what you think, if any of it needs clarifying, and if I've made any mistakes. If you do use it to make something I'd love to see pictures, thanks.

Labels: , , ,

Monday, January 18, 2010

A wooly One Yard Wonders Folklore bag


Ever since I started amassing a mountain of felted sweaters in my craft room I've been thinking of making a bag from them, but I hadn't quite got round to it. I got the book One Yard Wonders just before Christmas and I've been watching all the beautiful projects people have been posting from it in the Flickr Group . I really liked all the versions of the Folklore Bag that were popping up so I decided to cut out the pattern for that one and give it a go with one of the sweaters I had.

The beauty of the One Yard Wonders book is that each pattern uses one yard or less, so with making the lining in a different fabric, I was able to fit all of the outer pattern pieces for the bag on one rather large felted dark grey cable-knit sweater. I cut the front and back and top band from the front of the sweater, the straps from the back, and the side piece was cut from the two arms sewn together to make one long piece. It was lucky that the sweater I had was very large so that I could try and match the cable patterns on the front and back of the bag. In retrospect it probably wasn't the best sweater to use for my first bag because it was so chunky, but I learnt a lot from it.


The pattern has pleats under the top band but I decided that this would not work too well with my chunky sweater so I used the lining pattern piece for the outside. Sewing the pieces together was a bit of a challenge for me, and my machine, but we managed it by taking it very slowly over the really thick bits, and I definitely had to baste it all together by hand first. I didn't overstitch the seams as the pattern suggests for cotton, that would have killed my machine I'm sure.

I decided the bag needed a home dec weight fabric for the lining to match the chunkiness of the knit so I opted for some plain green Ikea fabric I already had, but I did sneak a little bit of print onto the inside pocket, a green Dala horse. I chose to overstitch around the top of the bag by hand with a simple running stitch. This gave it some stability and I quite like the effect of the hand stitching. The bag is supposed to have a magnetic clasp but I didn't have one so decided to go without, at least for now.


Overall I'm pretty happy with this bag and I learnt a lot making it. It definitely won't be the last wool bag I make, or my last project from One Yard Wonders.

Labels: , ,

Friday, January 8, 2010

A button bracelet


My lovely Secret Santa sent me these gorgeous buttons as part of my pressie and as they are so pretty I wanted to try and make them into some kind of jewellery. I used some wire (gold because that's all I had, left over from our wedding favours) to weave through the holes and link them all together. This gives it a nice amount of stiffness and helps stop the buttons twisting. To cover up the wire I threaded some very fine ribbon over the top. Initially I was thinking it would be a necklace with the buttons just in front, but then I decided it works better as a bracelet. I don't have any clasps at the moment so for now I'll just have to get someone to help me tie it on with a bow. Thank you Lucy! :)

Labels: , ,

Tuesday, January 5, 2010

Russian dolls and a seal


These are what Freja selected for me to make first from the Japanese felting book I got for Christmas. Considering I don't read Japanese so just had to go by the pictures, I think they turned out okay. I made the seal first, he's about 6cm long, and then the doll with the purple scarf. She's about 4 cm tall and my Mum claimed her so I had to make another one for Freja.

Labels: , ,