Bands Away - tidy up those headbands!
I have been doing the Design: Creation of Artifacts in Society at Coursera and our homework has been to design and make an artifact to fix something that bugs us. I chose to work on finding a better way of storing my daughter's headbands. Bands Away (yes, it was also part of the assignment to name it!) is what I came up with...

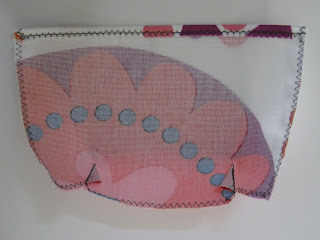
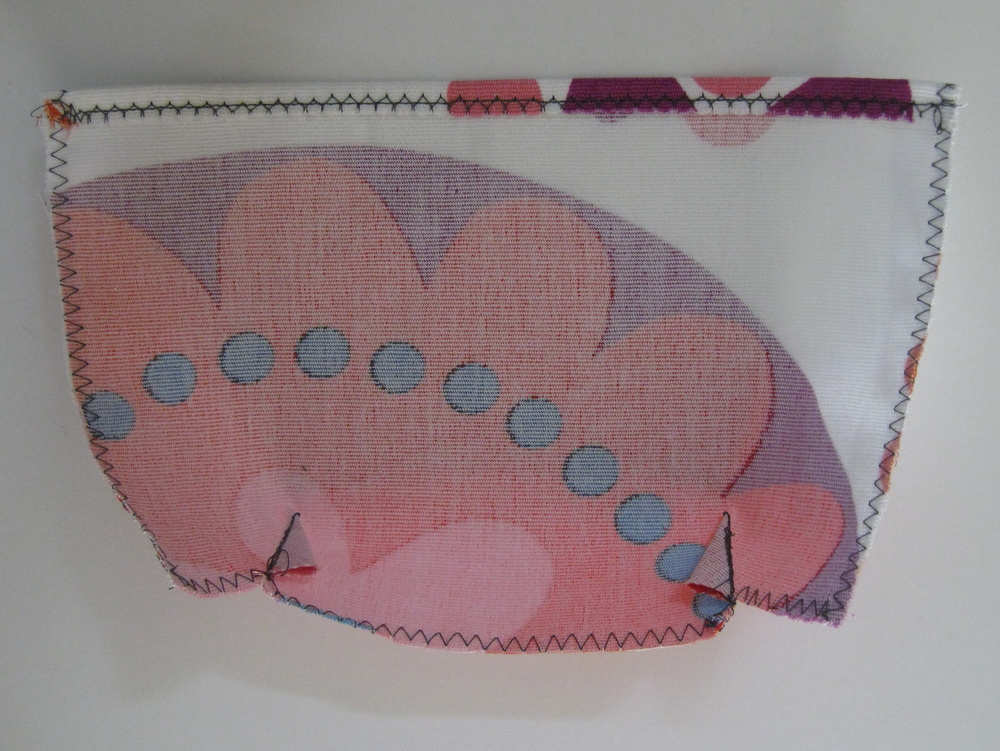
It's deep hanging fabric pockets which are tapered to hold the headbands snugly and to allow the pockets to overlap so that it can fit lots of headbands in. Each pocket can hold several headbands depending on how wide they are. Flowers, bows, tiaras all fit in beautifully. There is a hidden wooden dowel in the top to keep it rigid, and the ribbons at the top can be tied in lots of different ways to allow it to be hung almost anywhere.
It can be hung from a hook, or a door handle, or a towel rail...


If you have the same problem with headband clutter that we
did and would like to make your own, then there here's how I made it.
Please use this information for personal use only. If you would like to
make these to sell then I would appreciate it if you contact me first. (And please don't look too closely at my wonky sewing!).
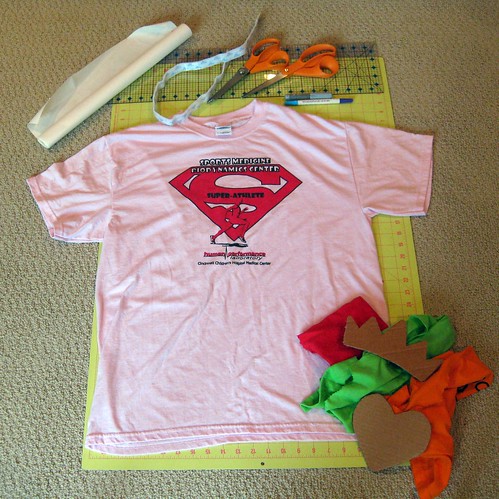
Materials:
Fabric for pockets.
I used furnishing weight cotton from Ikea. It needs to be fairly heavyweight, something like denim would work well, I think quilting cotton would be too thin without some reinforcement.
30" x 9" Fabric for backing, same weight as pockets.
I used plain white cotton canvas. It can be the same fabric as the pockets but note that the reverse will be seen when the edges are turned to hem them.
Grosgrain ribbon 48"long
Thin wooden dowel 6" long
Click here to download Pocket Pattern pdf file.
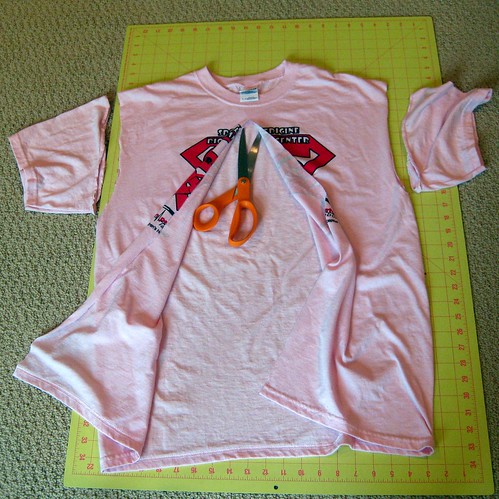
 1. Print out pocket pattern and check it has printed to the correct scale using a ruler. Cut out 8 pocket pieces. I found it easiest to cut out rectangles 8" x 5.75" first then trim the bottom edge. Mark where the corner of the darts is.


3. Cut a rectangle 9" by 30" from the backing fabric. It is helpful to mark a guideline along each long edge 1" from the edge. With the top edge 4" from the top of the backing fabric align the sides of the pocket parallel to the edge of the fabric (using this guide line). Pin sides and bottom edge.
 4. Straight stitch down one edge, across the bottom, up other edge, then along the diagonal lines marked on pattern piece. This creates the tapered shape of the pocket which allows them to be overlapped.

5. Pin next pocket 2.75" from the top of the first and sew as before.

6. Repeat until all pockets are sewn on. As you go it is helpful to check that the tops of the pockets are equally spaced from the top edge, as well as the pocket above, just in case something has moved along the way.

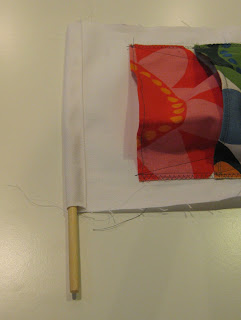
7. Cut a piece of dowel 6" long. Fold top edge of fabric over and stitch to make pocket wide enough for the dowel to slot into. Insert dowel in fully.
8. Fold the edge of the backing over twice and pin so that it covers the edges of the pockets but does not cover the diagonal stitching. Trim the corners to remove excess fabric before folding.
 9. Cut ribbon into two pieces, each 24" long. Fold the end in half and pin one piece each side where the backing folds over at the ends of the dowel. Sew around the whole piece as close to the pockets as possible.

10. Your Bands Away is now finished, fill it with headbands and hang it somewhere!


It's deep hanging fabric pockets which are tapered to hold the headbands snugly and to allow the pockets to overlap so that it can fit lots of headbands in. Each pocket can hold several headbands depending on how wide they are. Flowers, bows, tiaras all fit in beautifully. There is a hidden wooden dowel in the top to keep it rigid, and the ribbons at the top can be tied in lots of different ways to allow it to be hung almost anywhere.
It can be hung from a hook, or a door handle, or a towel rail...

...or even from a closet rail.

Materials:
Fabric for pockets.
I used furnishing weight cotton from Ikea. It needs to be fairly heavyweight, something like denim would work well, I think quilting cotton would be too thin without some reinforcement.
30" x 9" Fabric for backing, same weight as pockets.
I used plain white cotton canvas. It can be the same fabric as the pockets but note that the reverse will be seen when the edges are turned to hem them.
Grosgrain ribbon 48"long
Thin wooden dowel 6" long
Click here to download Pocket Pattern pdf file.


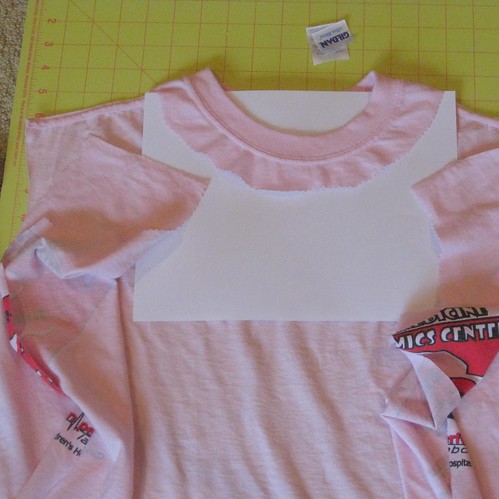
2. Zigzag around all edges then turn top over by 0.25" and hem inwards. Sew darts.

3. Cut a rectangle 9" by 30" from the backing fabric. It is helpful to mark a guideline along each long edge 1" from the edge. With the top edge 4" from the top of the backing fabric align the sides of the pocket parallel to the edge of the fabric (using this guide line). Pin sides and bottom edge.


5. Pin next pocket 2.75" from the top of the first and sew as before.

6. Repeat until all pockets are sewn on. As you go it is helpful to check that the tops of the pockets are equally spaced from the top edge, as well as the pocket above, just in case something has moved along the way.

7. Cut a piece of dowel 6" long. Fold top edge of fabric over and stitch to make pocket wide enough for the dowel to slot into. Insert dowel in fully.

8. Fold the edge of the backing over twice and pin so that it covers the edges of the pockets but does not cover the diagonal stitching. Trim the corners to remove excess fabric before folding.


10. Your Bands Away is now finished, fill it with headbands and hang it somewhere!
Labels: Bands Away, Coursera. design, hairbands, Headband, storage
posted by Gail at
December 07, 2012
0 Comments
![]()
![]()